Products
Relay
Relay is a network proxy that can be configured to encrypt or decrypt sensitive data as it passes between a client and a destination server. Relay can be used with your own API or with third-party APIs. It is designed to be easy to use and requires minimal changes to your existing code.
To process data encrypted by Relay with your own code, you can use either Evervault Functions or Evervault Enclaves.
Getting Started
Encrypt with Relay
Use Relay to encrypt data sent from a browser before it reaches your server.
Get StartedEncrypting data with Relay
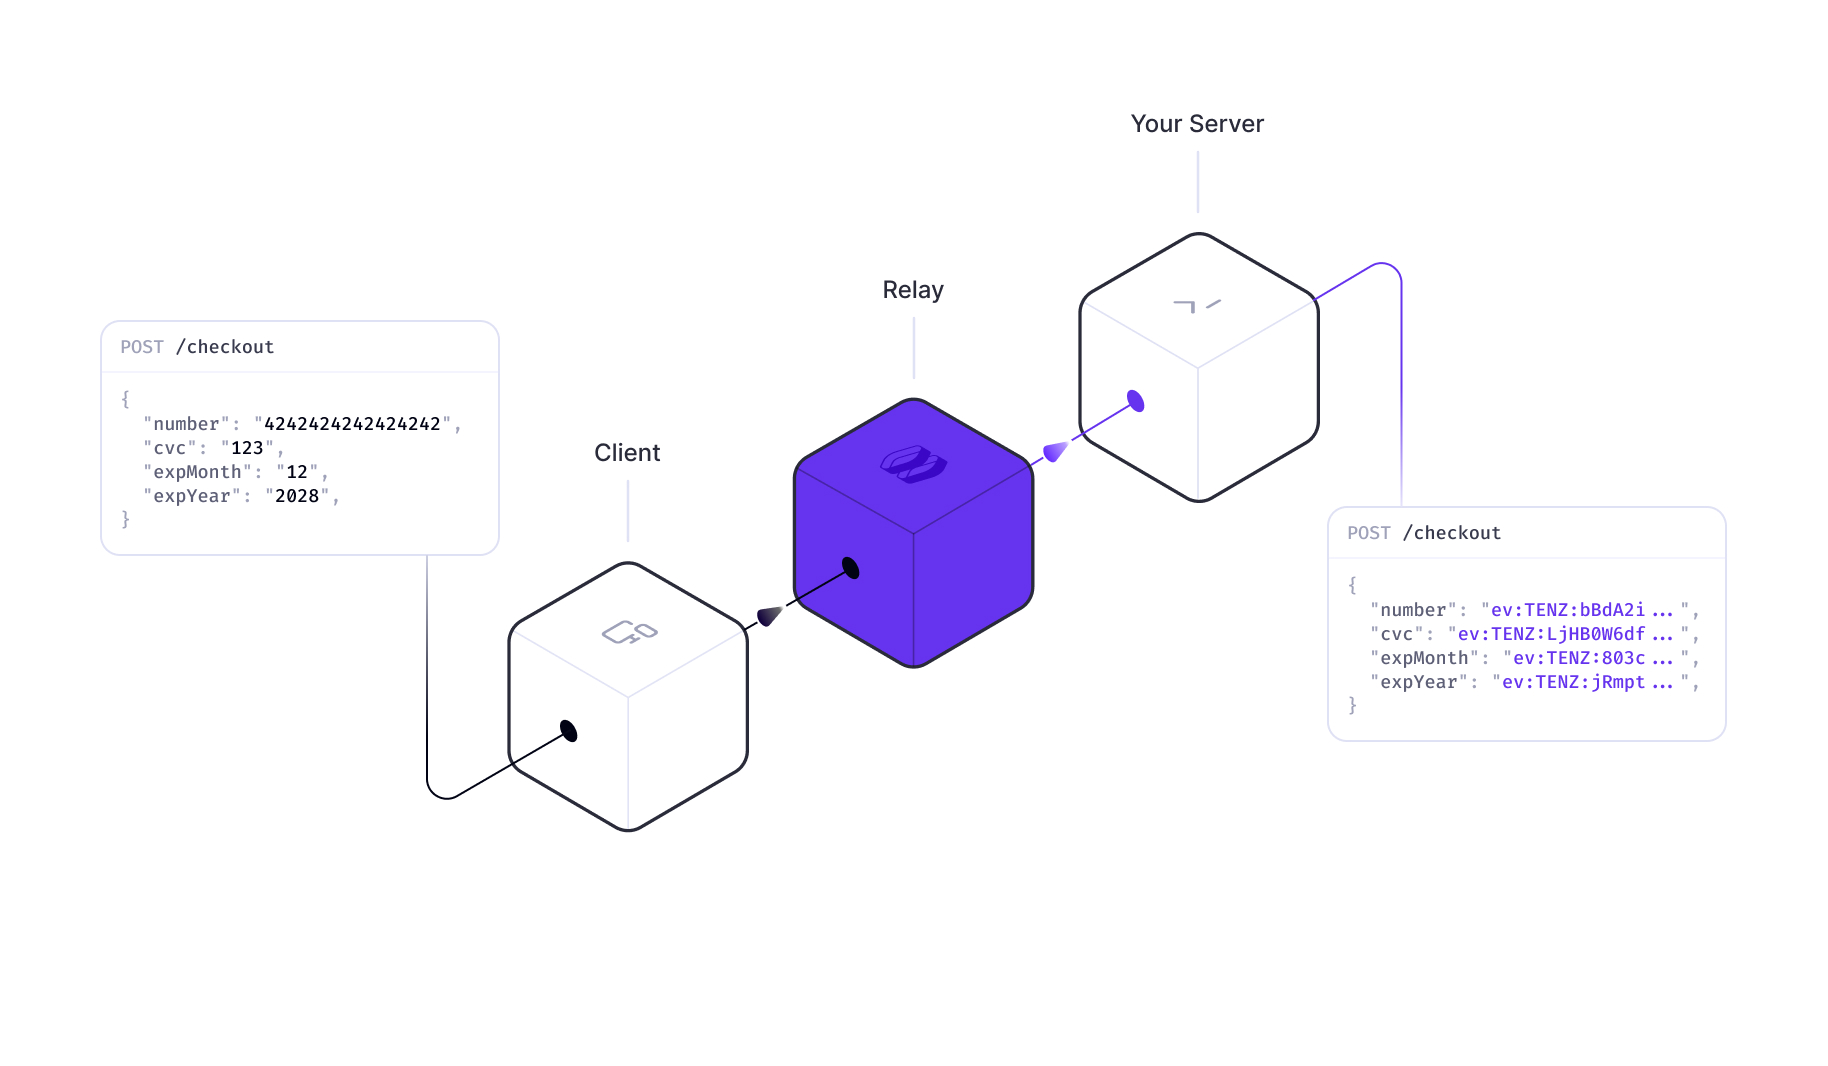
A common use case for Relay is to encrypt sensitive data before it reaches your own API. Configure a request action to encrypt the fields you want to secure. Encrypted data can then be safely stored in your database or used with any Evervault product. To process it using your own code, you can use either Evervault Functions or Evervault Enclaves.
Sending requests through Relay
Sending requests through Relay is as simple as changing the URL of your API endpoint to the Relay URL. Relay will intercept the request, encrypt or decrypt the data as configured, and forward it to the original destination.
Response decryption
When working with your own API, you may want to decrypt encrypted data that is returned from your API in order to show it to users. This can be done by configuring a response action to decrypt the data you want to display.
Decrypting data with Relay
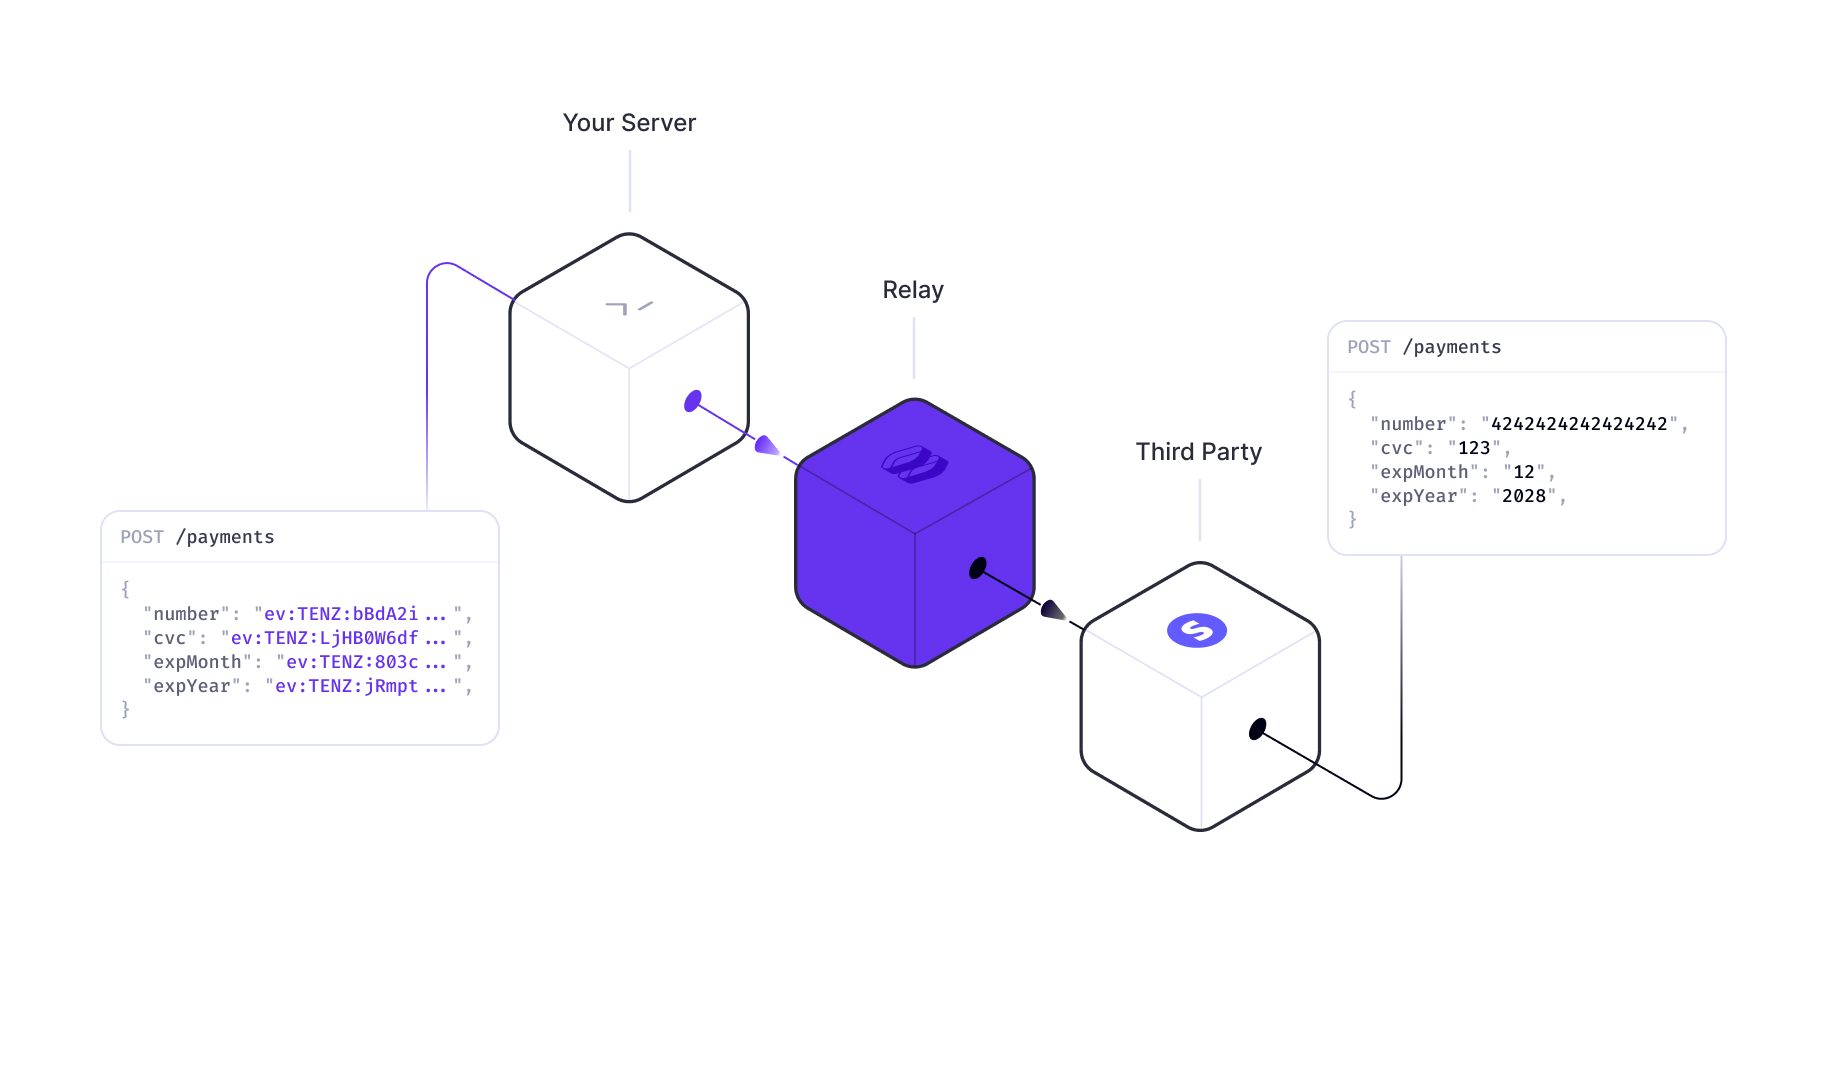
Relay can also be used to share encrypted data with third-party APIs. This allows you to store the encrypted data while still using third party services as if it was plain text data. This can be done by creating a Relay pointed at the third party API and configuring a request action to decrypt the fields you want to share. Learn more from our Working with Third-Party APIs guide.
Response encryption
When working with third-party APIs, you may want to encrypt sensitive data that is returned in responses from their API. This can be done by configuring a response action to encrypt the fields you want to secure.
Configuring Relay
Relays can be configured to encrypt or decrypt data with route actions. Route actions are a set of rules that determine how a Relay should handle data on request and reponse for certain paths and content types. You can configure route actions inside the Evervault Dashboard.

Path Matching
Route actions will only be applied to requests that match the route path. Route paths can be configured to match a specific path or multiple paths with a wildcard.
| Example | Description |
|---|---|
| / | Matches requests to the root path. |
| /checkout | Matches requests to /checkout |
| /patients/*/report | Matches requests to /patients/1/report, /patients/2/report, etc. |
| /users/** | Matches requests prefixed with /users. e.g /users/1, /users/1/addresses, etc. |
| /** | Matches all requests. |
Selecting Fields
Route actions are only applied to data that matches the list of selected fields defined on an action. Fields can be selected in different ways depending on the type of the request.
JSON
For JSON payloads, you can select fields using JSONPath. JSONPath is a query language for JSON that allows you to select fields by their path in the JSON object.
| Example | Description |
|---|---|
| $.name | Selects the name field. |
| $.address.* | Selects all fields in the address object. |
| $.patients.*.name | Selects the name field in all patient objects. |
| $.patients[?(@.country == 'IE')] | Selects all patient objects where the country field equals IE. |
| $..* | Selects all fields in the JSON object. |
JSON Payloads are supported for requests where the content-type subtype is json. The subtype is the part of the content-type after the /. For example, a content-type of application/json+charset=utf8 has a subtype of json.
Forms
Form fields will be matched directly by name. Form data is only supported for requests with a content-type of application/x-www-form-urlencoded or multipart/form-data.
File Encryption is supported for multipart/form-data requests.
Headers
Headers can be selected by name.
API Key Authentication
API Key Authentication adds an additional layer of security to your Relay. When enabled, requests through Relay will require a valid Evervault API Key to be passed in a X-Evervault-Api-Key header and your App's ID to be passed in a X-Evervault-App-Id header..
You can create API Keys inside of the Evervault Dashboard by navigating to App Settings -> API Keys.
When to use API Key Authentication
We strongly recommend enabling API Key Authentication for any Relay that is configured to decrypt data. However, it may not be necessary when you are working with your own API which has it's own authentication logic. When working with Third-Party API's it is important to use API Key Authentication to ensure that only your application can access the decrypted data.
File Encryption
Relay supports encrypting and decrypting files in multipart/form-data requests. Encrypted files will be forwarded on with an unchanged filename, but the bytes in the file will be fully encrypted. There is currently a per-request limit of 25 MB for encryption/decryption.
Evervault encrypted files begin with the unicode bytes %EVENC. You can use this to validate that files are arriving encrypted.
Custom Domains
By default, Relays are assigned a relay.evervault.app domain. You can also configure additional custom domains for your Relay. You can add a custom domain to your Relay in the Evervault Dashboard by navigating to Relay -> Settings -> Domains.
To add a custom domain, you will need to add a CNAME record to your DNS provider that points to custom-dns.relay.evervault.app.
Additionally, you will provided with an ownership validation TXT record that you must put on the _ev-custom-domain subdomain of your custom domain.
mTLS
Relay lets you upload a client certificate to authenticate with the target server over mTLS. You can upload a client cert for your Relay in the Evervault Dashboard by navigating to Relay -> Authentication. When mTLS is enabled, requests through that Relay will require an Evervault API Key. This can be added as an HTTP header (api-key: API-KEY...). If the mTLS cert has a password attached, it is encrypted with your team's encryption keys before being sent to Evervault's backend.
Service Limits
These limits apply to all requests sent through Relay. Limits can be increased upon request.
| Description | Limit |
|---|---|
| Max Payload Size (JSON, XML) | 5mb |
| Max File Size | 25mb |
| Max Chunked Size (transfer-encoding: chunked) | 700kb |
| Connection Timeout | 120s |
Alerts
Alerts allow you to see errors in Slack or be sent to any webhook url of your choice. You can create an alert for your Relay inside of the Evervault Dashboard by navigating to Relay -> Alerts -> Add Alert. When you configure a custom webhook to receive alerts, the following fields will be in the response.
Fields
The relay error code
Error Codes
Errors originating from within Relay can be distinguished by the X-Evervault-Error-Code header. The responses will have a content type of application/problem+json and a payload of the following structure:
If you have received one of these errors, you can use this Relay error code reference to help resolve the issue:
Error Codes
This error indicates you are sending a request to a Relay (e.g my-api-com.relay.evervault.app) which doesn't exist. Ensure you have entered the Relay subdomain correctly. Also, ensure you have configured your Relay correctly by following our Relay documentation.
If you are still having issues, please contact support.
The target took too long to respond. The error can have many causes ranging from network issues to malformed client requests. Ensure the target domain URL is correct, wait a few moments and try again. If the error persists, reach out to the owner of the target domain through any support channels they have in place.
This error occurs when Relay is configured to perform response encryption and receives an unsupported content type as a response from the endpoint. Currently, Relay can only encrypt JSON, XML and multipart/form-data structured data.
If your endpoint does not support these formats, one way to get around this limitation is to move your request logic into a Function in which you parse the plaintext into a suitable form, encrypt it and return it to the client.
There was an issue authenticating with the provided API key. Ensure that you are using the correct API key.
This error indicates that an invalid hostname was provided while communicating with Relay in Forward Proxy mode. Ensure you have entered the downstream hostname correctly, and that it can be resolved when requesting it directly.
If this issue persists, please contact support.
The API key provided does not have sufficient grants to perform the actions requested. Please review the grants given to your API Key.
This request exceeds the request size limit in Relay. The current per-request limit is 25 MB for encryption/decryption of multipart data, and 5 MB for all other content types.
The content type header received by Relay was malformed, preventing the body from being processed.
If you believe that this is a mistake, please contact support.
There was an issue with Relay itself. Try again in a few moments. If the issue persists, reach out to support.
A ciphertext's data policy prevented it from being decrypted. Ensure your data policy's configuration is correct.
This error indicates that Relay received a CONNECT request with no hostname while operating in Forward Proxy mode. Ensure you have entered the downstream hostname correctly, and that it can be resolved when requesting it directly.
If this issue persists, please contact support.
There was an issue finding a Relay for the provided domain. Make sure you are using the correct domain. If your domain is correct but you are still seeing this issue, ensure you have Relay configured correctly by following our Relay documentation.
There was encrypted data where it wasn't expected. This can mean a number of things:
- An inbound request header value contained Evervault encrypted data.
- An inbound request payload had Evervault encrypted data as the value of one of the fields, which was not going to be encrypted.
- The target URI for the inbound request had Evervault encrypted data as part of the path.
Relay experienced an unexpected networking error occurred while communicating with the downstream service. Please confirm that the downstream service is accessible when not routing through Relay, and ensure that any whilelisting requirements have been met.
Relay received a request using the CONNECT method which is only supported when interacting in forward proxy mode. Please see advanced usage for further information on using Relay as a forward proxy.
The server is unable (or refuses) to process the request sent by the client, due to an issue that is perceived by the server to be a client problem.
A Relay with authentication enabled was requested without valid credentials. Please see our docs on authentication for information on Relay's auth scheme.
Advanced Usage
For most use-cases, the integration described above will be sufficient. However in certain cases, for example when you cannot change the hostname used by a third party library, you may need to integrate Relay as a Forward-Proxy. Integrating in this manner is more onerous as it requires installing the Relay certificate chain, and configuring the relevant traffic to be proxied via Evervault Relay acting as an HTTP CONNECT Proxy.
To integrate with Relay in Forward Proxy mode you will need to:
- Trust the Relay cert chain on your server. The cert can be obtained from ca.evervault.com.
- Identify the best approach for establishing a HTTP Tunnel in your language of choice.
- For example, in NodeJS this is likely using an Agent (which can be created using the Evervault NodeJS SDK), or in JVM based languages this is through the VM's
http.proxyHostconfiguration options.
- For example, in NodeJS this is likely using an Agent (which can be created using the Evervault NodeJS SDK), or in JVM based languages this is through the VM's
- Supply your proxy authentication credentials to Relay using basic auth. This can be done during either the initial CONNECT request or the subsequent proxied request using the
Proxy-Authorizationheader. The value should be basic auth credentials, with your app id as the username, and your api key as the password.- Note: Relay will only proxy requests to hosts which have explicitly been created in your app, and cannot be treated as a generic forward proxy.
You can test Relay as a forward proxy using curl: